Pivoting and SSH Port forwarding Basics -Part 1
First and foremost, what is SSH tunneling and how does it work?
SSH tunneling is a technique that allows traffic to be routed through an endpoint which the operator can access through SSH. SSH allows many forms of tunneling, from simple port forwarding to creating tap interfaces and basically establish a VPN connection.
I’ll lay down here the various forms of SSH port forwarding.There are three main forms of SSH port forwarding:
- Local port forwarding
- Remote port forwarding
- Dynamic port forwarding
Local port forwarding
When the operator employes local port forwarding, he creates a proxy on his device, listening on a certain port, which will route traffic through an SSH tunnel to a remote host he has SSH access to. From there the host will send traffic to the remote host the operator specified while setting up the tunnel. It’s called “local” because it creates a local proxy (hosted on the operator’s machine) to forward traffic to a remote resource. Ok, theory is all well and good, but how do you actually use local port forwarding? The command syntax is:
ssh -L localPort:targetIp:targetPort user@sshGateway
With:
-Lbeing the option to instruct SSH to instantiate a local port forwarding tunnellocalPortbeing the port on the operator’s device on which the proxy will be createdtargetIpbeing the remote host the operator wants to reach through the tunneltargetPortbeing the port on the remote host the operator wants to reach through the tunneluserbeing the user he has the credential ofsshGatewaybeing the device the operator has SSH access to
Let’s have a look at a typical scenario. In the following image, our operator is denied access to a web server located at the IP address 10.0.0.2 on port 80. The firewall, however, allows SSH connections and the operator manages to connect to a server located at 10.0.0.1 as root. From there he sees the server he has logged on can “see” the webserver.
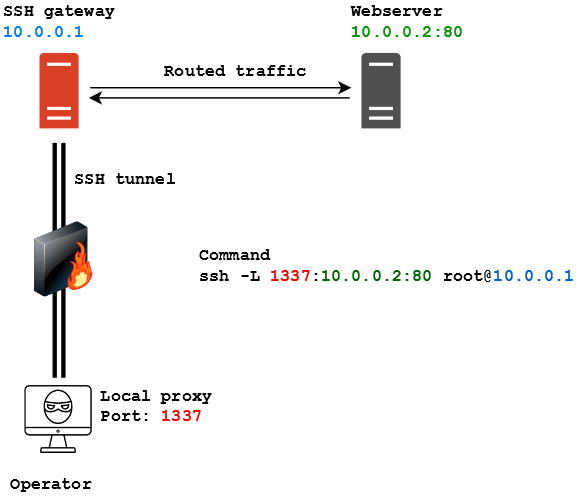
As written in the image, the command to spawn an SSH tunnel for local port forwarding is:
ssh -L 1337:10.0.0.2:80 [email protected]
Let’s say now I have to access a resource that’s listening locally on the SSH gateway. It happened on a couple of occasions that a machine I compromised had a webserver listening locally. That meant I couldn’t access it through the browser by trying to contact the machine IP directly. I had SSH access but no means of accessing the webserver remotely. Through local port forwarding I was able to reach the local webserver by putting the IP address of the SSH server as the target:
ssh -L 1337:127.0.0.1:80 [email protected]
This basically means “Mr 10.0.0.1, please forward all the traffic I’m sending from my 1337 to yourself on port 80”.
This kind of forwarding is also very useful in those situation where you manage to compromise a machine which has access to a subnet where there are Windows hosts that can be accessed through Remote Desktop. Instead of forwarding port 1337 to port 80 on the target server you could forward local port 3389 to port 3389 on the target server. By doing that you can then try to Remote Desktop to yourself and the SSH tunnel would route that to the remote Windows host. Alright, enough with this silly trickery, now let’s move on to remote port forwarding.
Remote port forwarding
Remote port forwarding is kind of the opposite of local port forwarding. While local port forwarding saw the operator initiate a connection through the tunnel, remote port forwarding is more similar to the NAT port forwarding you configure on your home router. Employing remote port forwarding the operator can instruct an SSH server to route traffic it receives on a certain port through the SSH tunnel, to another host on the network of the operator machine. It’s most common use, when it comes to offensive security, is routing reverse shell traffic to and from a listener. Let’s see an example:
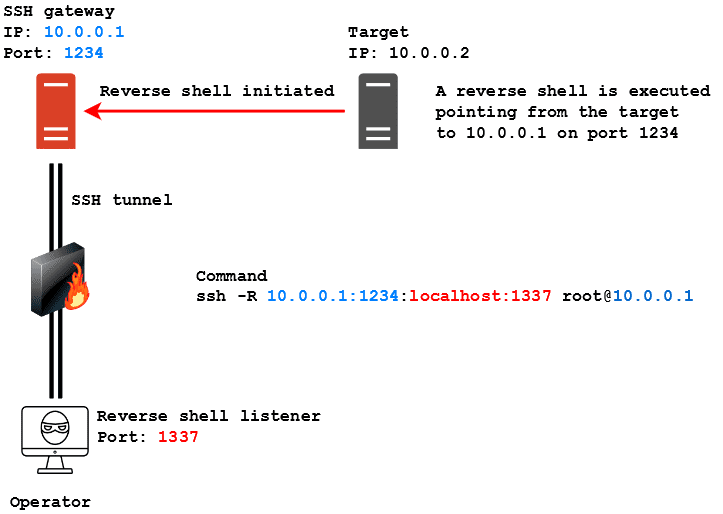
Here are operator managed to get SSH access to the same host we saw in the previous example, but this time he needs the server to route a reverse shell he executed on the target back to himself. The syntax to make this happen is the following:
ssh -R sshGatewayIp:sshGatewayPort:localIp:localPort user@sshGateway
With:
-Rbeing the option to instruct SSH to instantiate a remote port forwarding tunnel.- sshGatewayIp being the IP address of the SSH server that will route the traffic.
sshGatewayPortbeing the port of the SSH server that will receive the traffic that needs to be routed.localIpbeing IP address to which the traffic will be routed. Most of the times it’s going to be the operators.localPortbeing the port to which the traffic will be routed. Most of the times it’s going to be the operator’s listener’s portuserbeing the user he has the credential ofsshGatewaybeing the device the operator has SSH access to
To be more specific, in this scenario a reverse shell connection is initiated by the target machine, pointing to the SSH gateway on port 1234. The SSH gateway has no listener active to deal with the reverse shell, but through remote port forwarding has been instructed to route traffic entering port 1234 to the operator’s machine, which has a listener on port 1337. In this way the SSH gateway routes traffic to the operator and a successful connection is established between the target and the operator’s device, using the SSH gateway as pivot. The command to instruct the SSH server to do this is the following:
ssh -R 10.0.0.1:1234:localhost:1337 [email protected]
Take notice that, unlike local port forwarding, here the IP on which the server listens must be specified. That’s because otherwise, the server will automatically start to listen on IP 127.0.0.1, hence remote connections from the target pointing to its IP address will fail has no daemon is listening on its real IP.
NOTE: I learned the hard way (== swearing like hell because connections didn’t work) that the directive “GatewayPorts client-specified” MUST be present inside the server’s /etc/ssh/sshd_config otherwise the SSH server is going to listen for connection on 127.0.0.1, thus making the tunnel useless. Make sure this directive is present inside the config, otherwise add it (needs root privileges) and make sure to restart the SSH server!
Dynamic port forwarding and SSHuttle
The last kind of port forwarding SSH provides is called dynamic port forwarding. This technique is kinda similar to local port forwarding, but instead of specifying a single host/port pair to which traffic will be routed, it’s the SSH gateway which gets to decide where to route the traffic. That means if you send a packet to a host in the same subnet of the SSH server, this one is going to automatically route it to the destination you specified, provided you have instructed your OS to proxy traffic through the SSH gateway. Its syntax is like this:
ssh -D localPort user@sshGateway
With:
-Dbeing the option to instruct SSH to instantiate a dynamic port forwarding tunnellocalPortbeing the port on the operator’s machine on which the proxy will be createduserbeing the user he has the credential ofsshGatewaybeing the device the operator has SSH access to
Let’s have a look at the following scenario:
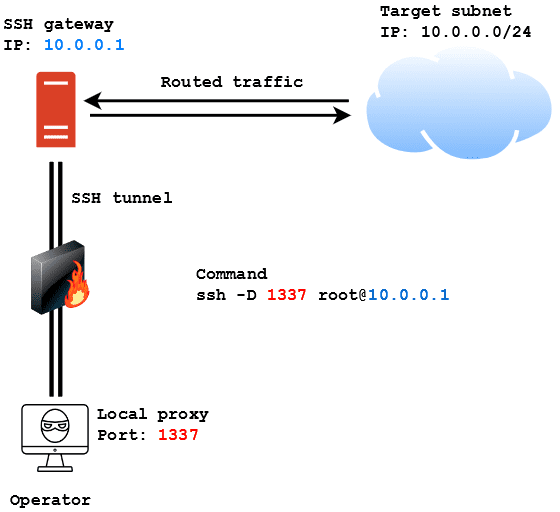
In this case, the operator wants to access the 10.0.0.0/24 subnet from outside the network. If he manages to get SSH access to the SSH gateway he can use the following command to instantiate a proxy on his machine on port 1337 and then use proxychains to proxy traffic through that port to reach the machines in the subnet:
ssh -D 1337 [email protected]
This technique is really useful but it has a huge downside: it often messes up the traffic and interferes with tools like Nmap. Scanning networks through an SSH gateway using dynamic port forwarding is a huge PITA most of the time. While searching for a solution to this during my time I came across SSHuttle. This tool creates a tun interface on the operator’s machine (much like a VPN) and then sets rules to forward traffic for the specified subnet through the tun interface. The cool thing about it is that it does not need root access to the SSH gateway (only on the operator machine). Its syntax is the following:
sshuttle -r user@sshGateway network/netmask
In the previous scenario the command to spawn a tun interface with SSHuttle and route traffic to the subnet would have been:
sshuttle -r [email protected] 10.0.0.0/24
A thing which I couldn’t find in the documentation but that I really needed in the lab was the ability to use public-key authentication with SSHuttle. The correct way to do it is by employing the following syntax:
sshuttle -r user@sshGateway network/netmask -e 'ssh -i /path/to/private_key'
The -e option is used to specify ssh commands to execute with SSHuttle. In this case the operator can specify the -i SSH flag with the path to the private key in order to access the SSH gateway without providing a password.
I know it’s pretty basic, I know everyone can do that and I know it’s nothing exceptional, but I like it and I find it really cool!
references –>. https://www.youtube.com/watch?v=JIsfErEbWGg&list=PLZOToVAK85MpAUfM-VXUREYjnedPyA_6B
Thanks for visiting the blog!!! For corporate end Penetration testing training visit https://certcube.com/it-security-training-cybersecurity-services/offensive-ctf/

very good and clear article I easily understand it