BurpSuite Project Options for Pentesters (PART-9)
BURPSUITE PROJECT OPTIONS INTRODUCTION
It contains a large number of options that are beneficial at project and user levels. These options can be configured by normal options at the user level. Basically, for particular projects, we need to test an internal application and then we will need an upstream proxy or none.
PROJECT OPTIONS
These options are stored within the burp project file for disk projects and can be saved and loaded for configuration files.
OPTIONS: CONNECTIONS
Platform authentication
You can set up Burp using these parameters to perform platform authentication for you while connecting to destination web servers. For specific hosts, several authentication methods and credentials can be specified. On a per-host basis, platform authentication can also be turned off.
The authentication types that are supported include basic, NTLMv1, and NTLMv2. The only purpose of the domain and hostname fields is for NTLM authentication.
Upstream proxy servers
These options determine whether Burp sends outgoing requests to the target web server or an upstream proxy server.
You can provide different proxy settings for various target hosts, or groups of hosts, by defining several rules. The first rule that matches the target web server will be used when applying rules in order. Burp defaults to direct, non-proxied connections if no rule is found.
Socks Proxy
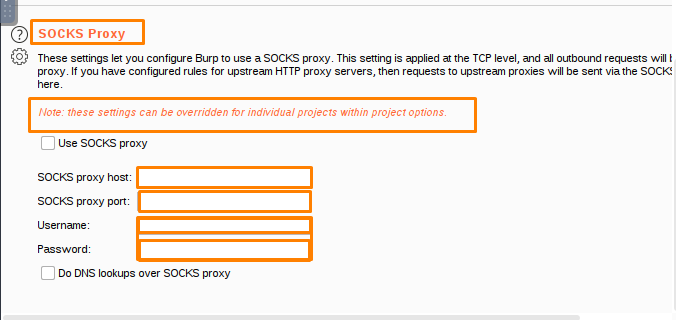
You can set up Burp to use a SOCKS proxy for all outgoing communications using these configuration options. All outgoing requests will go through this proxy if this setting is enabled at the TCP level.
If the option Do DNS lookups over SOCKS proxy is enabled, the proxy will resolve all domain names. There will be no local lookups.
Timeouts
These options define the timeouts that will be used for various network tasks. The following timeouts are available:
Connect-When connecting to a server, this setting determines how long Burp will wait for a response after opening a socket before concluding that the server is unreachable.
Normal-For most network communications, this setting determines how long Burp will wait before abandoning a request and recording a timeout.
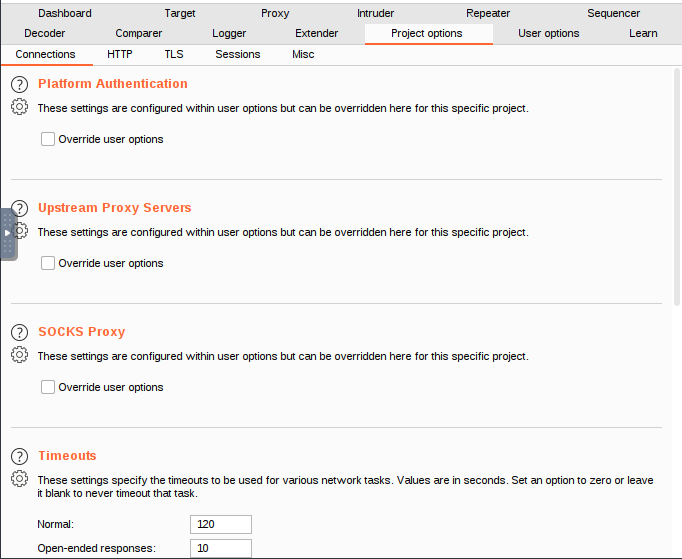
Hostname Resolution
These options provide you the option to override your computer’s DNS resolution by specifying hostname to IP address mappings.
A hostname and the IP address that should be assigned to it are both specified in each hostname resolution rule. Individual rules can be enabled or disabled.
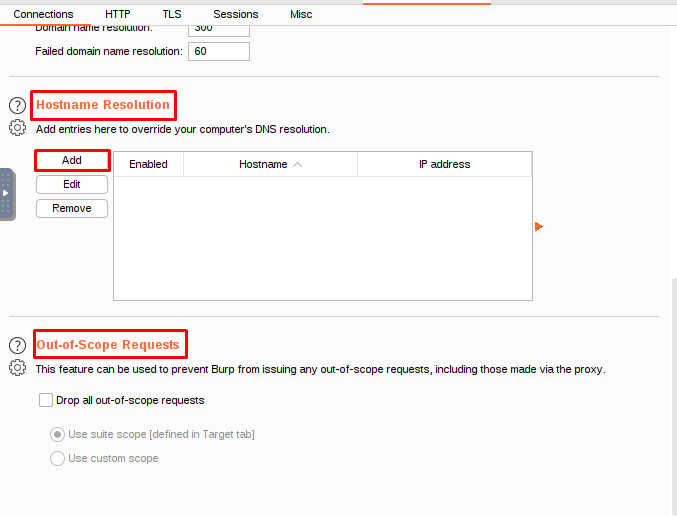
Out-of-scope requests
Burp can be stopped from making any requests that are outside of its intended scope by using this feature. When you need to ensure that no requests are sent to targets that are outside the scope of your current activity, it can be helpful. The outbound requests will be rejected by Burp even if the browser requests items that are not within its preview.
Options: HTTP
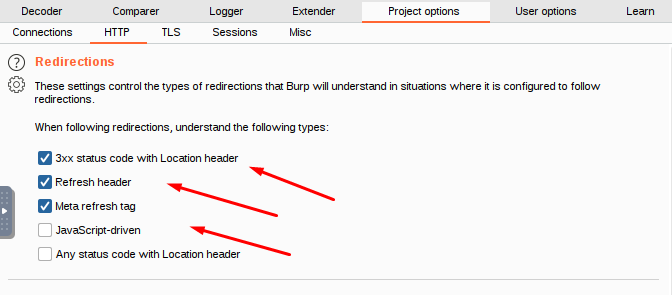
Redirections
When Burp is set up to follow redirections, these parameters regulate the kinds of redirections that it will be able to comprehend.
You can choose from the following forms of redirection:
- 3xx status code with a Location header
- Refresh header
- Meta refresh tag
- JavaScript-driven
- Any status code with a Location header
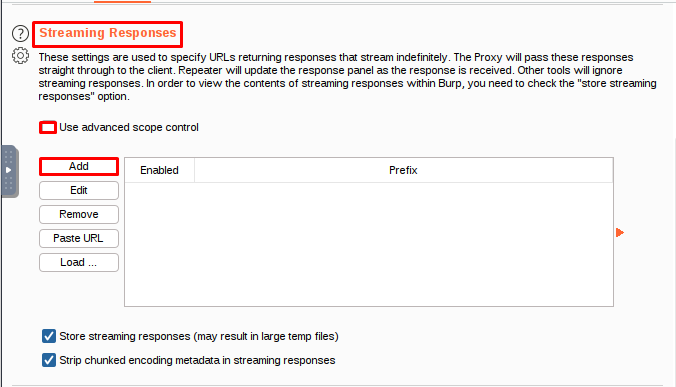
Streaming Responses
Streaming responses are frequently used in trading applications for functions such as continuously updating price data. Typically, some client-side script code makes a request, and the server keeps the response stream open, pushing additional data as it becomes available in real time. Intercepting proxies can break these applications because they use a store-and-forward model: the Proxy waits indefinitely for the streaming response to finish, and none of it is ever forwarded to the client.
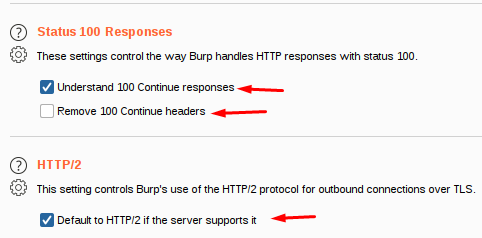
Status 100 responses
These options govern how Burp handles HTTP responses with the status code 100. These responses are common when a POST request is sent to the server and the server responds with an interim response before the request body is transmitted.
HTTP/1
Burp Suite creates a new TCP connection for each HTTP/1.1 request / response pair by default. If you check the Use keep-alive for HTTP/1 if the server supports it box, the system keeps the same TCP connection open so that multiple request / response pairs can use it.
HTTP/2
All servers that indicate support for HTTP/2 during the TLS handshake are automatically communicated with by Burp. Burp will use HTTP/1 even if the server supports HTTP/2 if you decline this option.
Regardless of your choices here, you can use the Inspector’s Protocol toggle to modify this default for a specific request. Keep in mind that this only applies to contexts that can be edited, such as a request that was intercepted by Burp Repeater or Burp Proxy.
Options:TLS
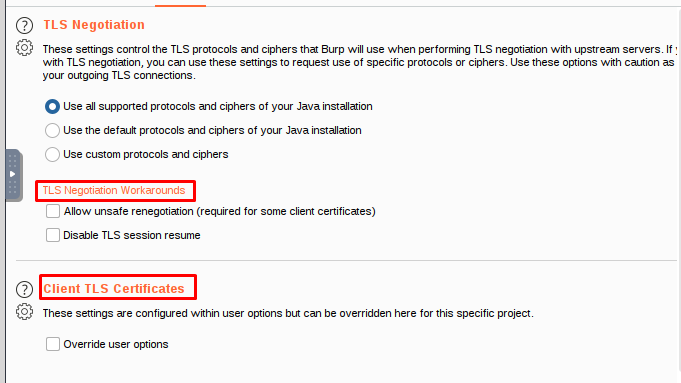
TLS negotiation -is a negotiation between two parties on a network – such as a browser and a web server – to establish the details of their connection.
Client TLS certificates
These settings allow you to configure the TLS certificates that Burp uses when requested by a destination host. You can configure multiple certificates, and specify which hosts each certificate is used for.
When a host requests a client TLS certificate, Burp uses the first certificate from the list of certificates for that host.
To add a TLS certificate to a client, open the Client TLS Certificate dialog and enter the destination hostname and certificate type.
Options: sessions
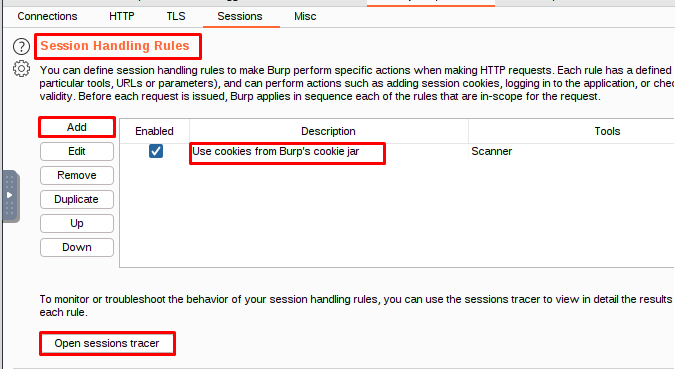
Session Handling Rules
Burp has specific rules for how it handles sessions, which you can control to some degree.
Each rule has two parts: the first part is the rule itself, and the second part is the reason why the rule is followed.
This rule applies to requests that use the specified tools, URLs, and parameters. The rule then executes specified actions when the request is made.
Burp performs actions based on the rules that have been defined for it, and also takes into account other functions that Burp performs.
The Scanner’s default session handling rule updates requests with cookies from Burp’s cookie jar, but this rule is not applied when the Scanner is managing its own sessions. If you want to disable this rule, you can. However, if you want to view the final, modified request for a scan issue, you need to send the request to Burp Repeater and issue it from there.
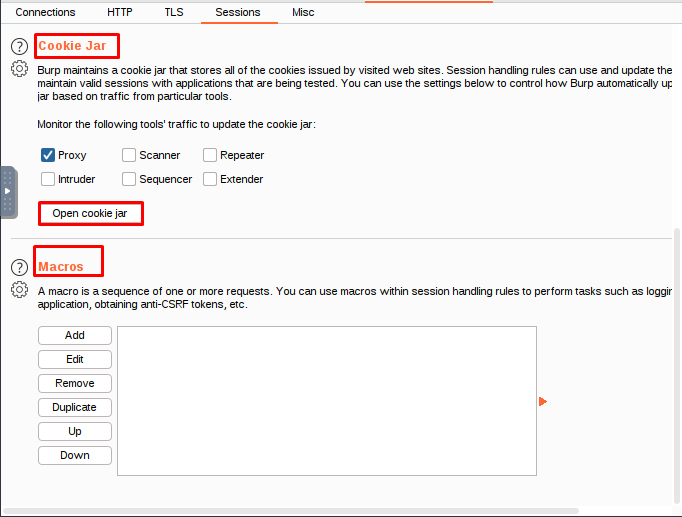
Cookie Jar
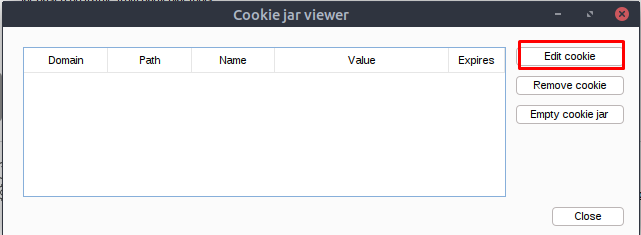
Burp stores all the cookies that are issued by websites you visit in its cookie jar. The cookie jar is shared between all of Burp’s tools.
Macros and session handling rules can use the cookie jar to automatically update outgoing requests with cookies.
You can configure the cookie jar to update cookies based on traffic from any of the following tools: the Proxy, the browser, or the application.
A proxy is a device that allows someone else to access a network or system. An intruder is someone who tries to access a network or system without authorization. A scanner is a device that can identify devices and vulnerabilities on a network. A sequencer is a device that can manage and control the activity of devices on a network. A repeater is a device that can increase the range of a signal. Extensions are devices that allow you to add functionality to a proxy, scanner, sequencer, or repeater.
Burp updates its cookie jar to include any cookies that are sent through the proxy, even if the application doesn’t update the value of the cookie itself. This can help ensure that you are able to access your session data even if the application doesn’t update its cookies frequently.
The cookie jar honors the domain and path of the cookies it contains.
Macros
Macros allow you to create and manage scripts or macros that Burp can use during testing.
Macros can be very helpful in automating tasks, but should be used with caution as they can increase the workload on your system.
A macro can help you verify the validity of your current session and login, and then perform a request of your choosing to get a token or nonce. This information can be used in another request to get the application into a state where the targeted request is accepted.
A macro can specify how cookies and parameters in a sequence should be handled, as well as any interdependencies between items.
You can add a new macro by clicking the Add button in the Macro Editor dialog box.
You can add, delete, or change macros in your list.
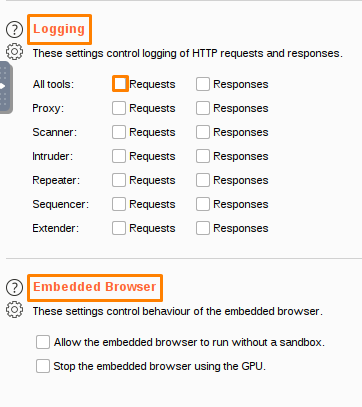
User Options
User-level options are stored within the local installation of Burp and are automatically reloaded each time Burp starts. They can also be saved and loaded from configuration files.
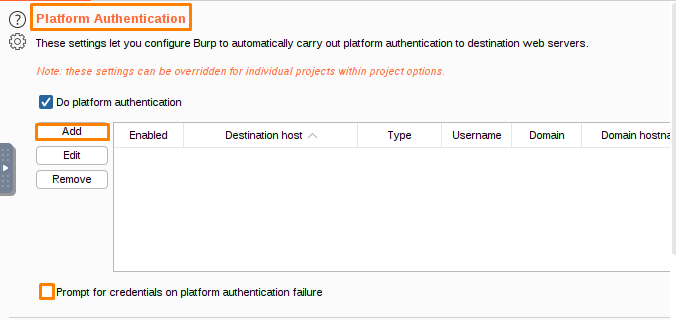
Platform authentication is a process of verifying the identity of a user or device by checking information stored on the platform.
These settings allow Burp to automatically authenticate to destination web servers using various authentication methods. You can configure authentication types and credentials for individual hosts, and disable platform authentication on a per-host basis.
To add authentication credentials for a platform, select Do platform authentication and select Add. From here, you can add the credentials for the platform you want to use.
The destination host is asking for authentication information, which can be either Basic, NTLMv1, or NTLMv2. The username is provided, as well as the password. The domain is also provided, as well as the hostname for the domain.
You can remove credentials from the list if you no longer need them.
If Burp encounters an authentication failure, it will prompt you for credentials.
The Platform authentication settings can be applied at both user and project levels. If you choose to set override options for this project only, the selected settings will only apply to the current project. There are timeouts associated with this setting, so be sure to choose a timeout that is appropriate for your project.
Burp allows you to specify how long it will wait before concluding that a network task has failed.
The Connect setting determines how long Burp waits for a response after opening a socket, while the Normal setting determines how long Burp waits before abandoning a request and recording a timeout. The Open-ended responses setting allows for delayed responses that do not contain a Content-Length or Transfer-Encoding HTTP header to be processed, while the Domain name resolution setting determines how often Burp re-performs successful domain name lookups. The Failed domain name resolution setting determines how often Burp reattempts unsuccessful domain name lookups.
These settings control how long Burp will wait before timing out when performing a certain function. If any of these settings are set to zero, Burp will never time out.
The Timeouts settings are project settings that apply only to the current project. Upstream proxy servers are not affected.
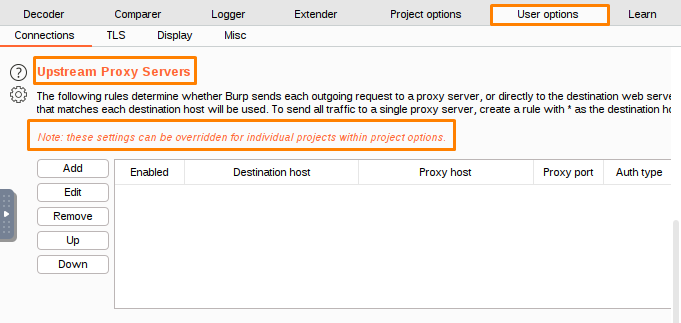
These settings control how Burp sends requests to other servers, instead of directly to the destination website.
Burp uses the first rule in the table that matches the destination web server to determine proxy settings. If no applicable upstream rules are found, Burp makes a direct connection to the destination server.
Add a new rule to the proxy server– This rule will forward all requests to the specified upstream proxy.
The destination host is the address that the packet going to, and the proxy host is the address that the packet is going to be sent.
The Java TLS options allow you to configure various aspects of the Java Secure Socket Extension (JSSE) library.
This paragraph tells you about the TLS features that are enabled. The options are available to enable various TLS features.
This setting allows Burp to use obsolete algorithms when negotiating TLS connections with live servers. If you want to connect to a server using Burp, you can disable this setting.
The Java TLS settings are specific to the current project. They will not affect other projects.
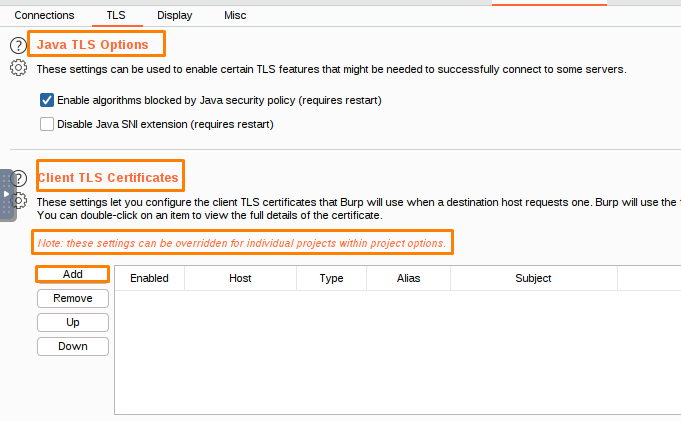
The TLS negotiation process determines the security protocol to be used for a secure connection between two devices.
These settings control how Burp talks to upstream servers.
To enable upstream TLS verification, click the ‘Verify upstream TLS’ button and select the protocols and ciphers you want Burp to use.
Your Java installation supports a variety of protocols and ciphers. You can use the default ones, or you can customize them to use specific protocols and ciphers.
There are a number of other options that are available.
This option allows you to use unsafe renegotiation, which may be necessary when using some client TLS certificates or attempting to work around other TLS problems. The Disable TLS session resume option controls whether Burp caches and reuses TLS connections between requests.
The TLS negotiation settings are specific to the current project.
This article explains how to configure Burp to use TLS certificates from a list of trusted sources. You can configure Burp to use multiple certificates, and specify which hosts each certificate is used for.
When a host requests a client TLS certificate, Burp uses the first certificate from the list of certificates for that host.
To add a client TLS certificate, click the Add button to open the Client TLS Certificate dialog, specify the destination host and certificate type, and hit OK.
The hosts associated with this name are *.example.com.
The ? symbol matches any character except a dot.
To use a single certificate for all hosts in a domain, you must use the * as the destination host.
This sentence summarizes that Burp supports certificates of different types, including parody certificates.
To create a certificate for use with a PKCS#12 file, select the location of the certificate file and the password for the certificate. If you’re using a hardware token or smartcard, you’ll need to select the location of the PKCS#11 library file for your device and enter your PIN code. Burp can then automatically find and load the appropriate library file. Finally, you can select the certificate to add to the PKCS#12 file.
You can also edit or reorder the list of rules if required.
The Client TLS certificate settings can apply to both user and project levels, but if you want to override those settings for just this project, you can do that.
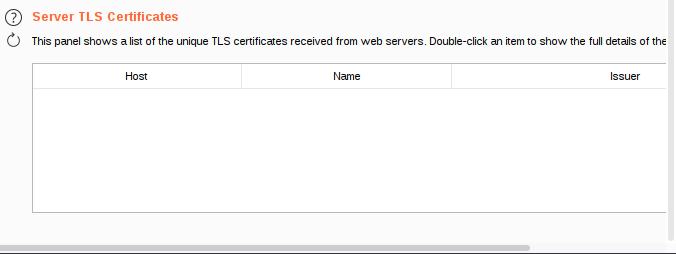
This panel provides information about all X509 certificates received from web servers. Double-click an item in the list to view the certificate details.
The Server TLS certificates settings are specific to the current project. They will not affect other projects in the same organization.
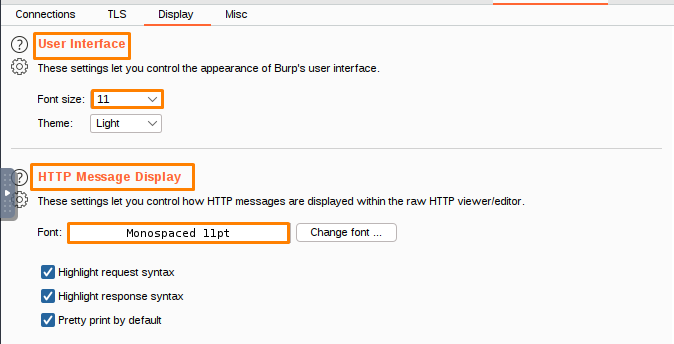
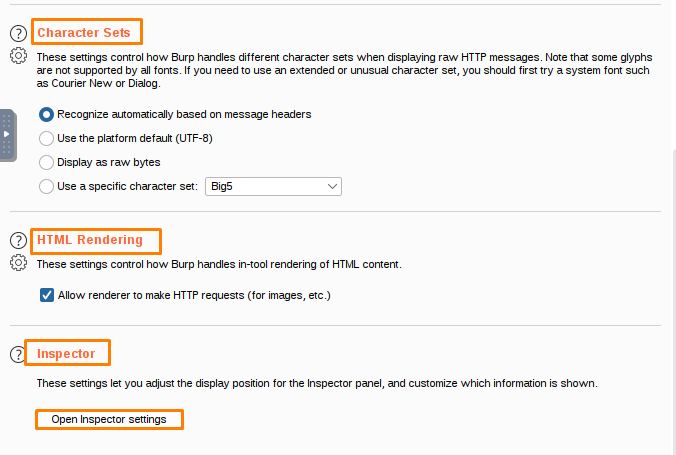
The Inspector and Message Editor settings let you customize how Inspector and the Message Editor work.
The Inspector and Message Editor settings let you control where the Inspector panel appears and what information is shown. Both have settings that control which widgets are displayed and where the panel is displayed on the screen.
A widget is a type of software that provides a user interface for controlling the behavior of a computer system.
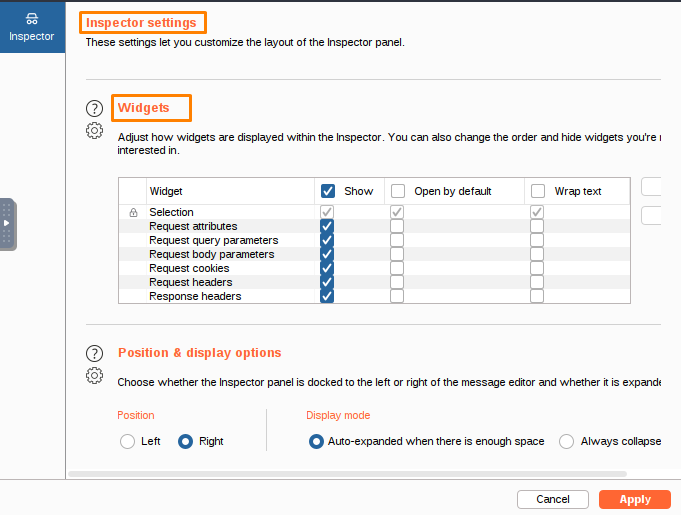
The Widgets settings let you control how widgets are displayed in the Inspector.
This setting controls how the Inspector panel shows and interacts with widgets. By default, all widgets are expanded. You can choose to have each widget be collapsed by default, and decide whether text inside the cells of the widgets should be wrapped.
This text provides information on how to position and display items on a web page.
The Position & display options settings let you choose the default layout for the Inspector panel.
You can set the panel’s default position (left or right) and display mode, which will determine how the Inspector is displayed.
- The Inspector settings are global, meaning they apply to all Burp Suite tools.
- The Inspector allows you to customize how messages are displayed.
- The Message editor tab enables you to edit and format text messages.
You can change the views that are shown in the message editor’s toolbar, and you can also control how the text on each view is displayed. You can also rearrange the list of views.
The author is discussing a study in which participants were asked to rate how much they agreed or disagreed with statements about their personal values. The study found that people who identified with more personal values were more likely to agree with statements about their values than people who identified with fewer personal values.
If the message contains valid content, the message editor displays the selected views. However, if the message is read-only, the message editor only displays the views that are relevant to the current context.
In Burp Repeater, the message editor displays all the available views, allowing you to add items even if they weren’t present in the original request.
The Message editor documentation provides more information about the Message editor.
This statement confirms that the Inspector and message editor settings are user settings that apply to all installations of Burp on your machine.
Path: Controls the path of the HTTP message. User-Agent: Controls the user agent of the HTTP message. Status: Controls the status of HTTP messages. Host: Controls the host of the HTTP message.
You can determine the font style and size, as well as font smoothing, for Burp. This can help you distinguish between different types of requests. Additionally, you can use highlight request syntax to make the contents of requests easier to read.
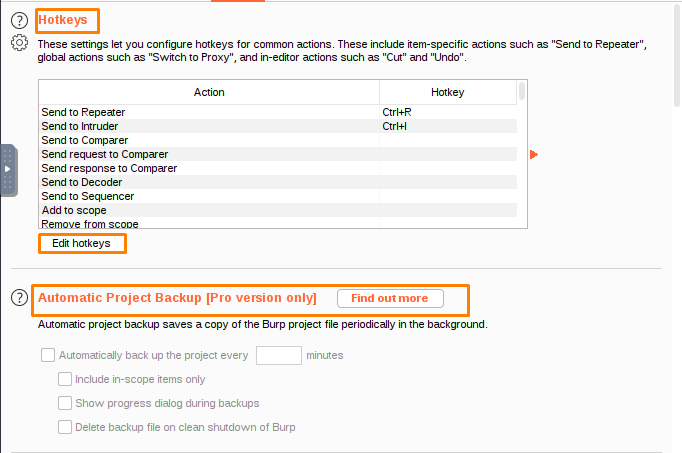
The Hotkey settings enable you to configure hotkeys for common actions within Burp. The available actions fall into three categories:
- Actions specific to individual HTTP requests or responses, such as Send to Repeater.
- Global actions, such as Switching to Proxy.
- In-editor actions, such as Cut and Undo.
Some hotkeys are configured by default.
To edit Burp’s current hotkeys:
- Click Edit hotkeys to display the Configure hotkeys dialog.
- Select the action that you want to configure.
- Type the hotkey you want to assign to that action. All hotkey combinations must use the Control key (or the Command key on MacOS). You may also use Shift or other available modifiers.
- Click OK.

That’s all Folks!! Thanks For visiting, Hope you enjoyed BurpSuite Project Options for Pentesters Blog.
Now it’s time to perform some practical’s and in the further blogs, we will learn the practical labs of portswigger academy.


Recent Comments